概述 Redisson是一个在Redis的基础上实现的Java驻内存数据网格(In-Memory Data Grid)。它不仅提供了一系列的分布式的Java常用对象,还提供了许多分布式服务。其中包括(BitSet, Set, Multimap, SortedSet, Map, List, Queue, BlockingQueue, Deque, BlockingDeque, Semaphore, Lock, AtomicLong, CountDownLatch, Publish / Subscribe, Bloom filter, Remote service, Spring cache, Executor service, Live Object service, Scheduler service) Redisson提供了使用Redis的最简单和最便捷的方法。Redisson的宗旨是促进使用者对Redis的关注分离(Separation of Concern),从而让使用者能够将精力更集中地放在处理业务逻辑上。
关于Redisson项目的详细介绍可以在官方网站 找到。
每个Redis服务实例都能管理多达1TB的内存。
能够完美的在云计算环境里使用,并且支持AWS ElastiCache主备版 ,AWS ElastiCache集群版 ,Azure Redis Cache 和阿里云(Aliyun)的云数据库Redis版
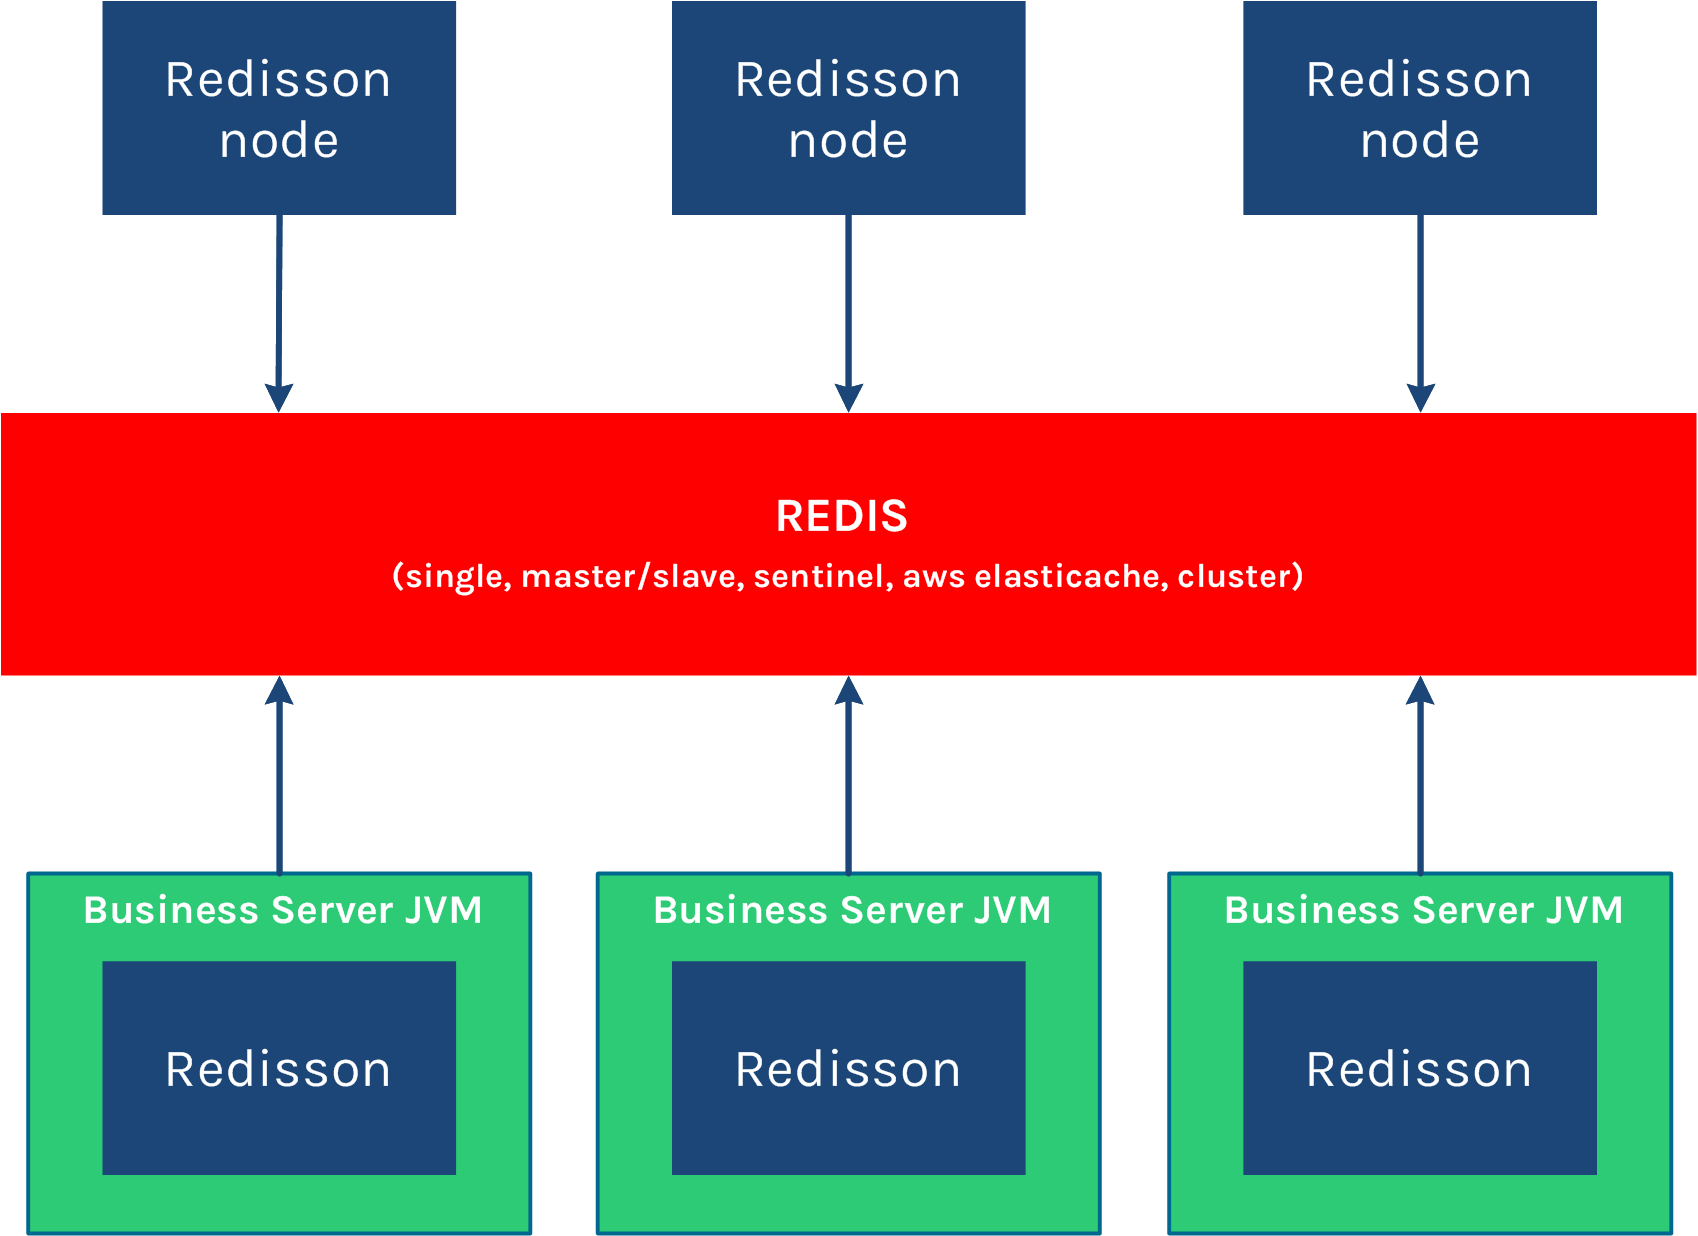
以下是Redisson的结构:
如果你现在正在使用其他的Redis的Java客户端,那么Redis命令和Redisson对象匹配列表 能够帮助你轻松的将现有代码迁徙到Redisson框架里来。
Redisson底层采用的是Netty 框架。支持Redis 2.8以上版本,支持Java1.6+以上版本。
接入Spring-Boot项目 引入依赖 1 2 3 4 5 6 7 8 9 10 11 12 13 14 15 16 17 18 19 20 <dependency > <groupId > org.springframework.boot</groupId > <artifactId > spring-boot-starter-web</artifactId > </dependency > <dependency > <groupId > org.redisson</groupId > <artifactId > redisson-spring-boot-starter</artifactId > <version > 3.23.4</version > </dependency > <dependency > <groupId > org.projectlombok</groupId > <artifactId > lombok</artifactId > <optional > true</optional > </dependency > <dependency > <groupId > org.springframework.boot</groupId > <artifactId > spring-boot-starter-test</artifactId > <scope > test</scope > </dependency >
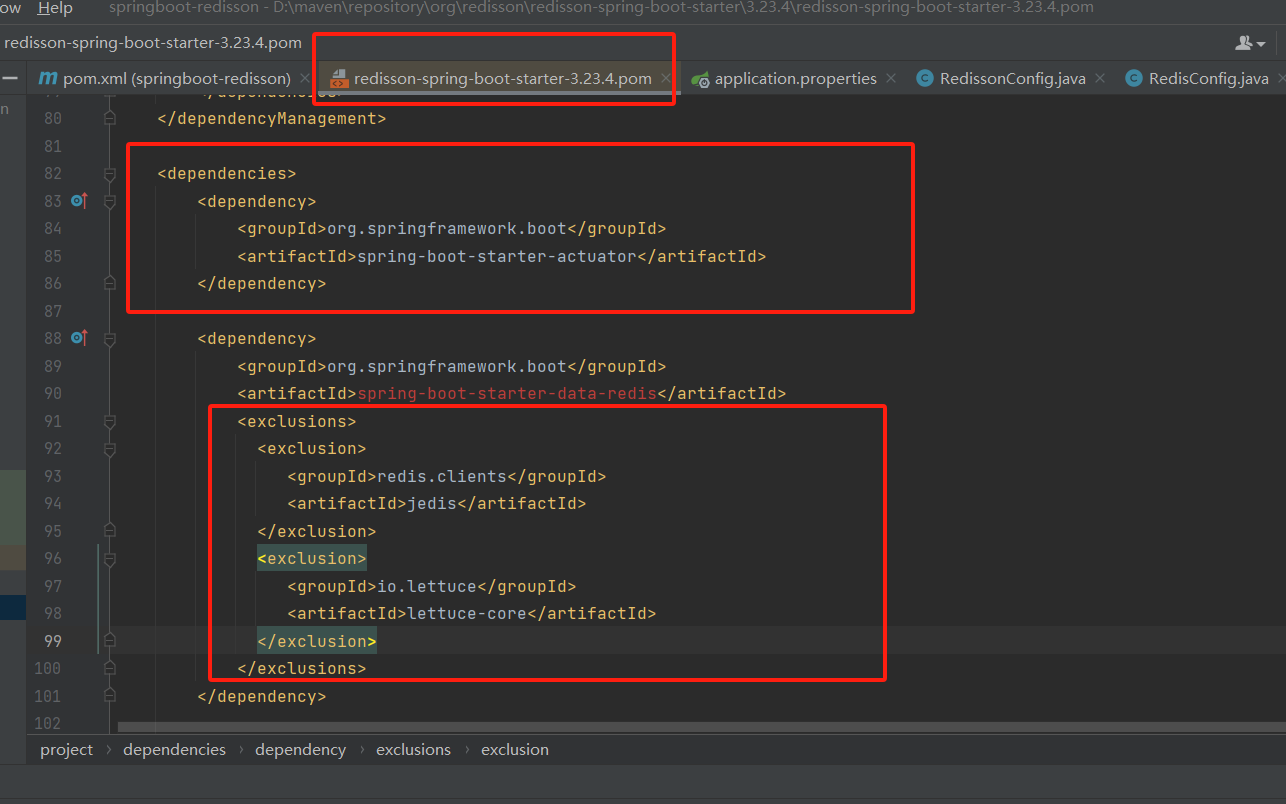
注意:引入次依赖后,无需再引入spring-boot-starter-data-redis,其redisson-spring-boot-starter内部已经进行了引入,且排除了Redis的Luttuce 以及 Jedis客户端
redission配置 1 2 3 4 5 6 7 server.port =9000 spring.redis.host =127.0.0.1 spring.redis.port =6379 spring.redis.password =
程序化配置 1 2 3 4 5 6 7 8 9 10 11 12 13 14 15 16 17 18 19 20 21 22 23 24 25 26 27 28 29 30 package com.cactus.redisson.config;import org.redisson.Redisson;import org.redisson.api.RedissonClient;import org.redisson.config.Config;import org.springframework.beans.factory.annotation.Value;import org.springframework.context.annotation.Bean;import org.springframework.context.annotation.Configuration;import java.io.IOException;@Configuration public class RedissonConfig {@Value("${spring.redis.host:127.0.0.1}") private String redisIp;@Value("${spring.redis.port:6379}") private String redisPort;@Bean public RedissonClient redissonClient () throws IOException {Config config = new Config ();"redis://" + redisIp + ":" + redisPort);return Redisson.create(config);
在项目使用Redission时,我们一般会使用 RedissonClient 进行数据操作,但有朋友或许觉得RedissonClient操作不方便,或者更喜欢使用 RedisTemplate进行操作,其实这两者也是可以共存的,我们只需要再定义RedisTemplate的配置类即可.
1 2 3 4 5 6 7 8 9 10 11 12 13 14 15 16 17 18 19 20 21 22 23 24 25 26 27 28 29 30 31 32 33 package com.cactus.redisson.config;import org.springframework.boot.autoconfigure.AutoConfigureAfter;import org.springframework.boot.autoconfigure.data.redis.RedisAutoConfiguration;import org.springframework.context.annotation.Bean;import org.springframework.context.annotation.Configuration;import org.springframework.data.redis.connection.RedisConnectionFactory;import org.springframework.data.redis.core.RedisTemplate;import org.springframework.data.redis.serializer.GenericJackson2JsonRedisSerializer;import org.springframework.data.redis.serializer.StringRedisSerializer;@Configuration @AutoConfigureAfter(RedisAutoConfiguration.class) public class RedisConfig {@Bean public RedisTemplate<String, Object> redisTemplate (RedisConnectionFactory connectionFactory) {new RedisTemplate <>();new GenericJackson2JsonRedisSerializer ());StringRedisSerializer stringRedisSerializer = new StringRedisSerializer ();return redisTemplate;
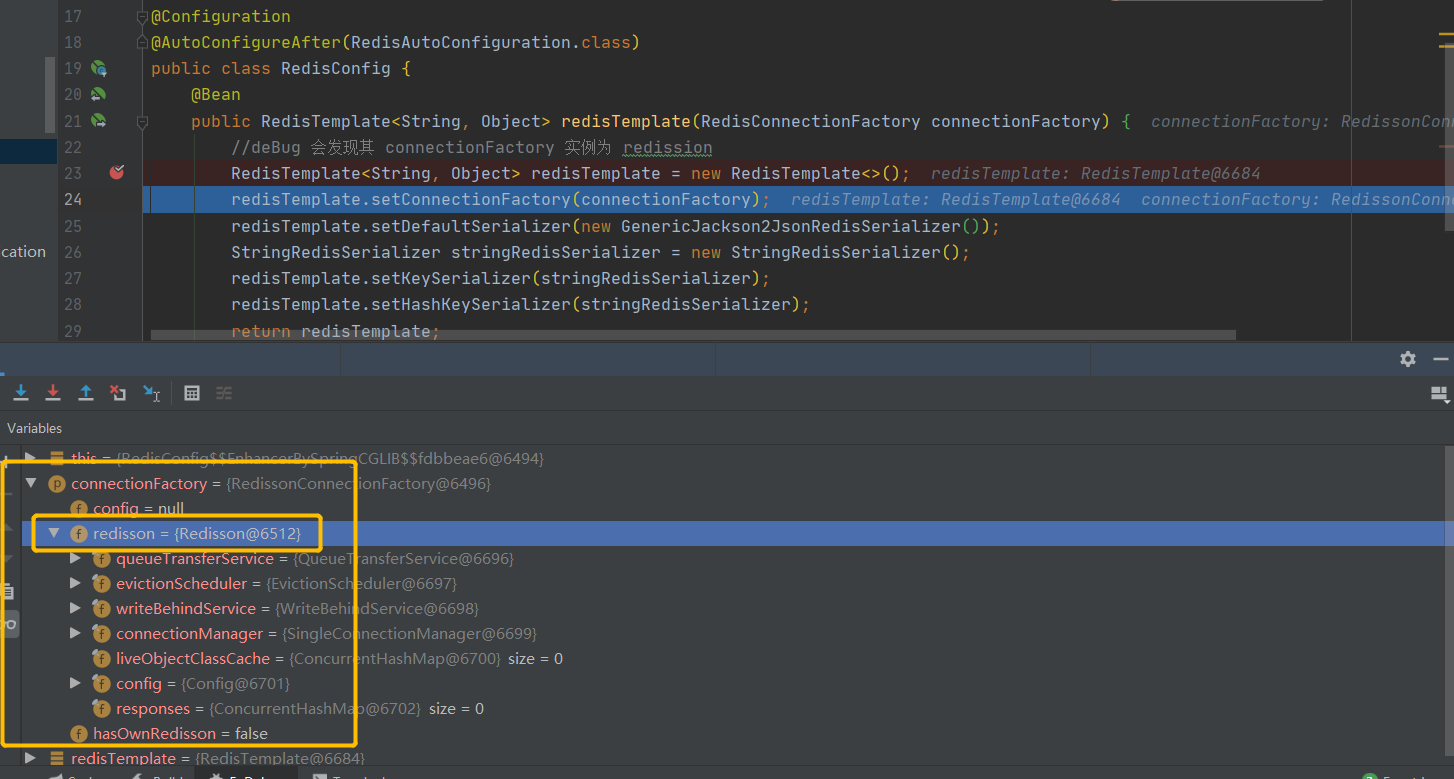
发现项目引入Redission后,RedisTemplate底层所用的连接工厂也是Redission
限流 我们是有面临高并发下需要对接口或者业务逻辑限流的问题,我们可以采用Guaua依赖下的RateLimiter 实现,实际上,Redisssion也有类似的限流功能
RateLimiter 被称为令牌桶限流,此类限流是首先定义好一个令牌桶,指明在一定时间内生成多少个令牌,每次访问时从令牌桶获取指定数量令牌,如果获取成功,则设为有效访问。
1.获取限流实例 需要使用redissonClient 来获取一个RRateLimiter限流实例
1 2 3 4 5 6 7 8 getRateLimiter (String name) ;
2.设置令牌桶规则 设置令牌桶规则,例如 1分钟秒内,生成6个有效令牌
1 2 3 4 5 6 7 8 9 10 void setRate (RateType mode, long rate, long rateInterval, RateIntervalUnit rateIntervalUnit) ;
3.对限流的业务进行令牌获取尝试 1 2 3 4 5 6 7 8 9 boolean tryAcquire () ;boolean tryAcquire (long permits ) ;boolean tryAcquire (long timeout, TimeUnit unit) ;
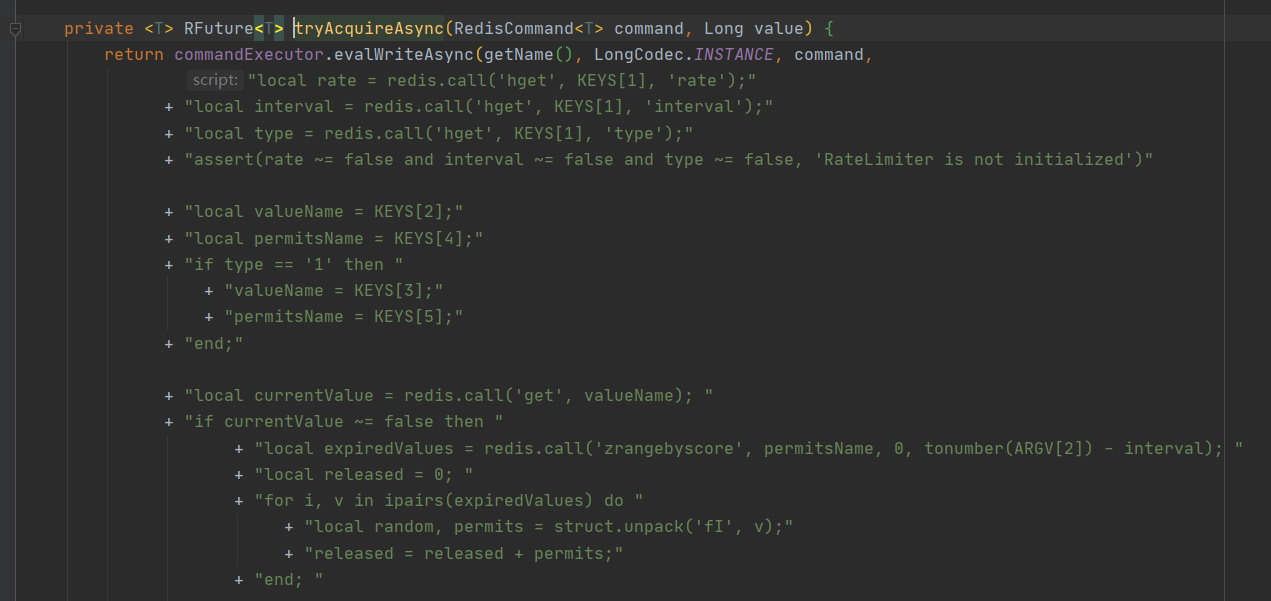
Redission 限流底层是使用的Lua脚本
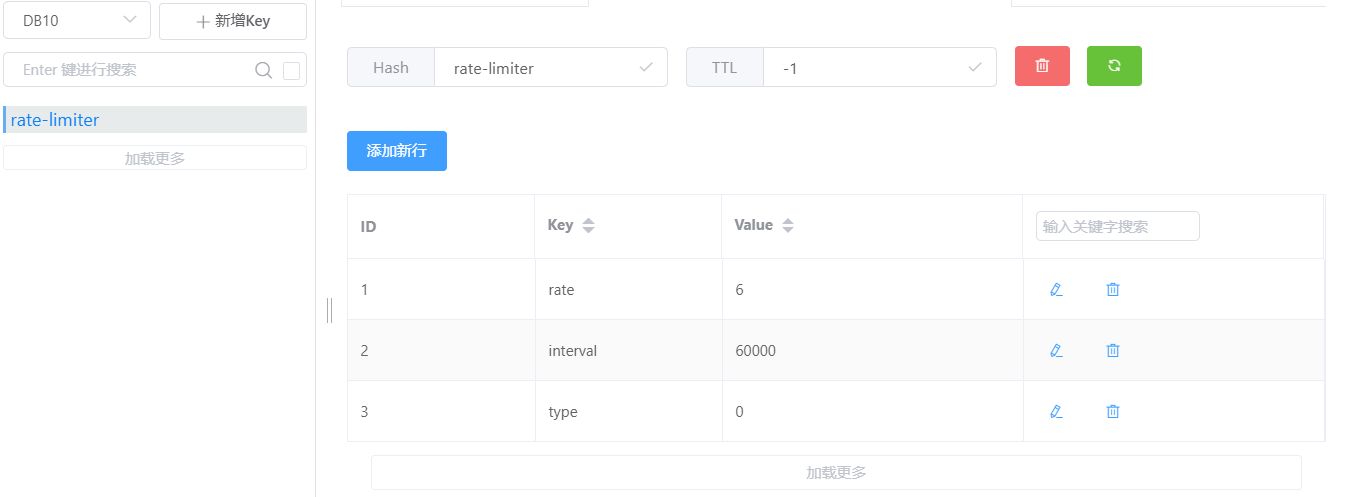
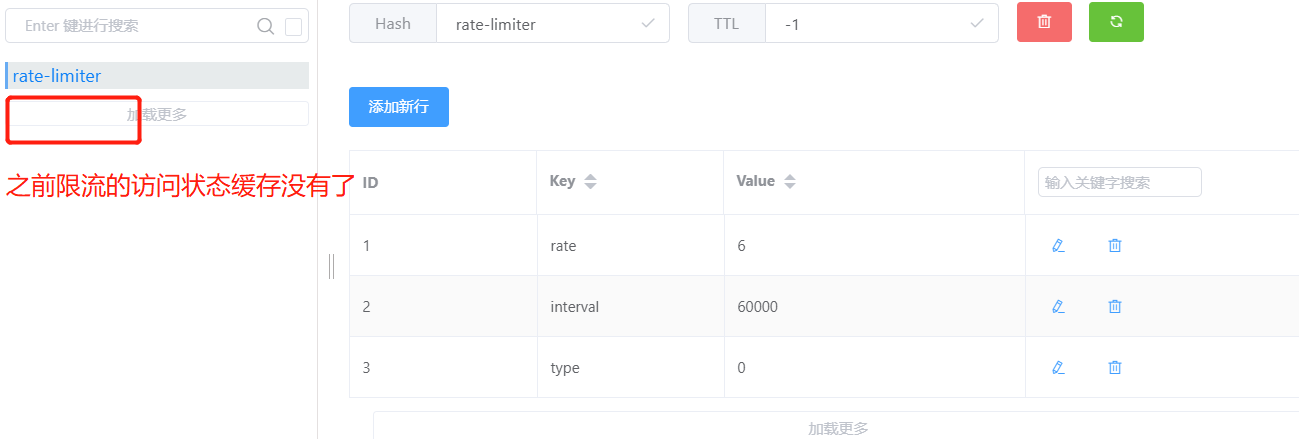
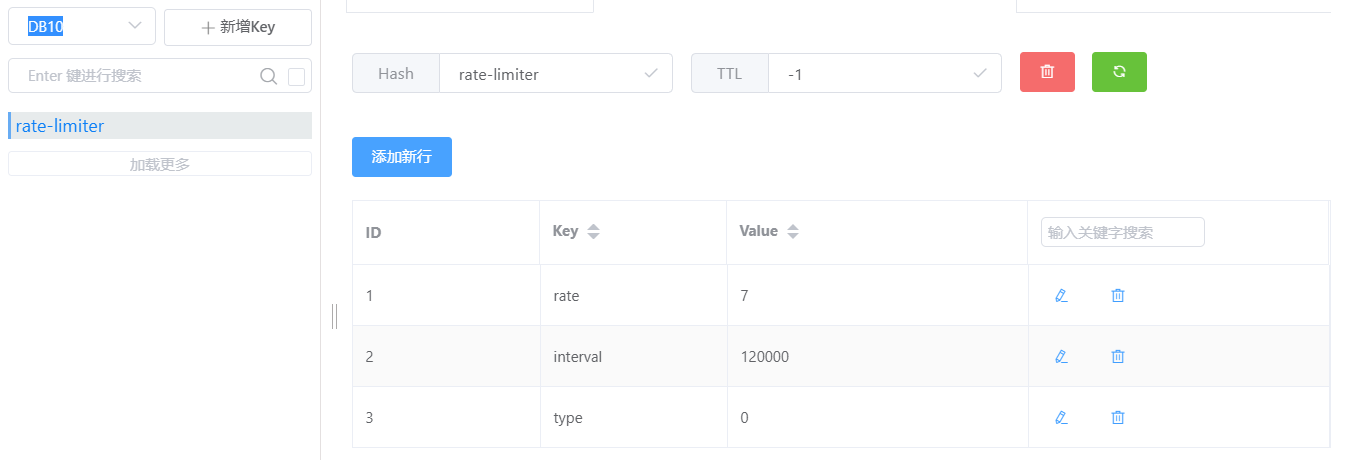
4.限流实战 在我们定义好限流实例与设置好限流规则后启动项目,发现指定数据库存在了一个缓存KEY,KEY的名字就是我们设置的限流实例名字
RateType.OVERALL 表示针对所有客户端
TestController
1 2 3 4 5 6 7 8 9 10 11 12 13 14 15 16 17 18 19 20 21 22 23 24 25 26 27 package com.cactus.redisson.controller;import com.cactus.redisson.service.LockService;import org.redisson.api.RLock;import org.redisson.api.RedissonClient;import org.springframework.beans.factory.annotation.Autowired;import org.springframework.web.bind.annotation.GetMapping;import org.springframework.web.bind.annotation.RequestMapping;import org.springframework.web.bind.annotation.RestController;@RestController @RequestMapping("/test") public class TestController {@Autowired private RedissonClient redissonClient;@Autowired private LockService lockService;@GetMapping("/rate/limiter") public String testRateLimiter () {return lockService.testRateLimiter();
LockService
1 2 3 4 5 6 7 8 9 10 11 12 13 14 15 16 17 18 19 20 21 22 23 24 25 26 27 28 29 30 31 32 33 34 35 36 37 38 39 40 41 42 43 44 45 46 package com.cactus.redisson.service;import org.redisson.api.RRateLimiter;import org.redisson.api.RateIntervalUnit;import org.redisson.api.RateType;import org.redisson.api.RedissonClient;import org.springframework.beans.factory.annotation.Autowired;import org.springframework.stereotype.Service;import javax.annotation.PostConstruct;@Service public class LockService {private RRateLimiter rateLimiter;@Autowired private RedissonClient redissonClient;@PostConstruct public void initRateLimiter () {RRateLimiter ra = redissonClient.getRateLimiter("rate-limiter" );6 , 1 , RateIntervalUnit.MINUTES);public String testRateLimiter () {boolean b = rateLimiter.tryAcquire();if (b) {return "ok" ;return "fail" ;
启动服务,查看redis数据库
接着,我们来模拟并发访问
页面访问url
1 http://127.0.0.1:9000/test/rate/limiter
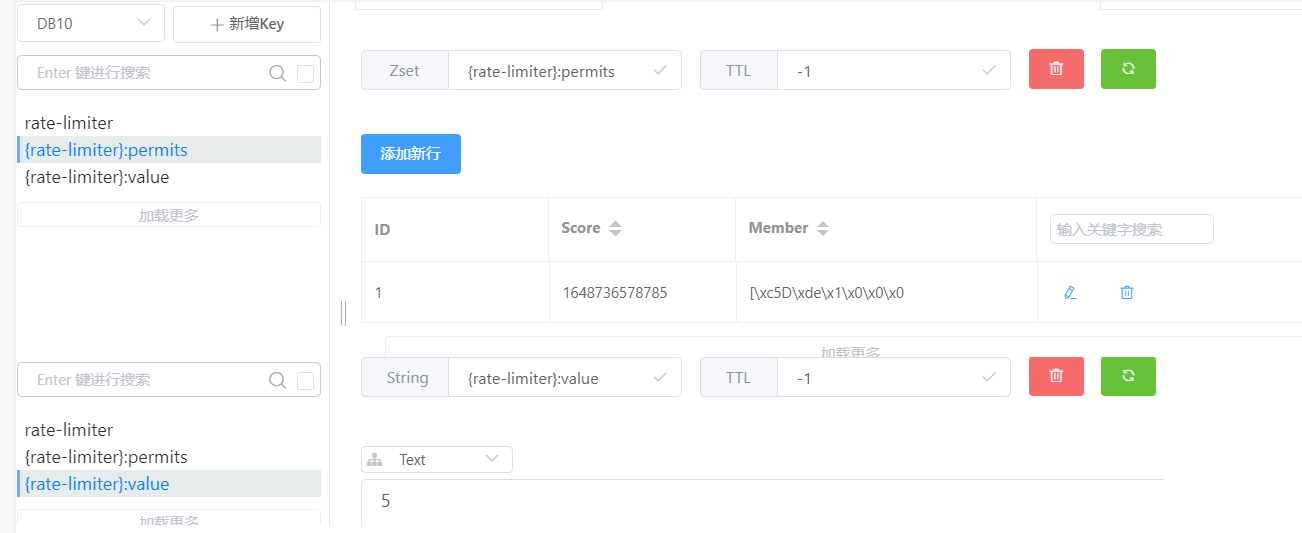
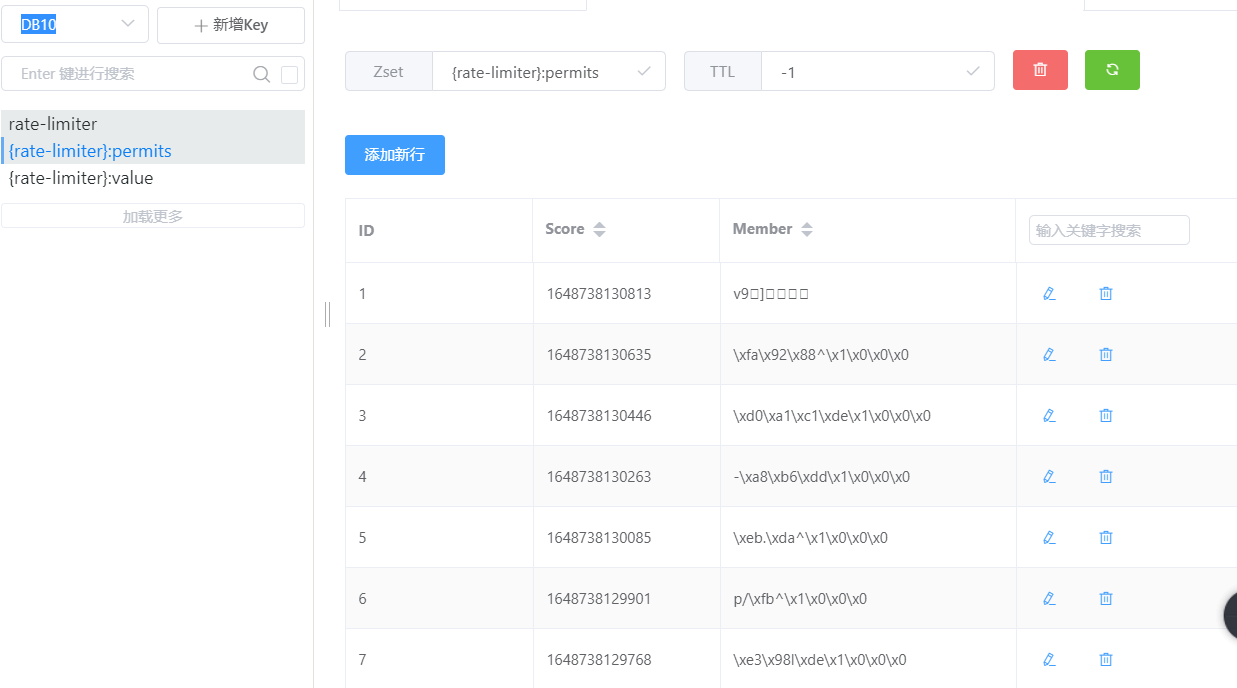
redis生成了两个新的缓存KEY,一个是Zset数据类型,一个是String类型
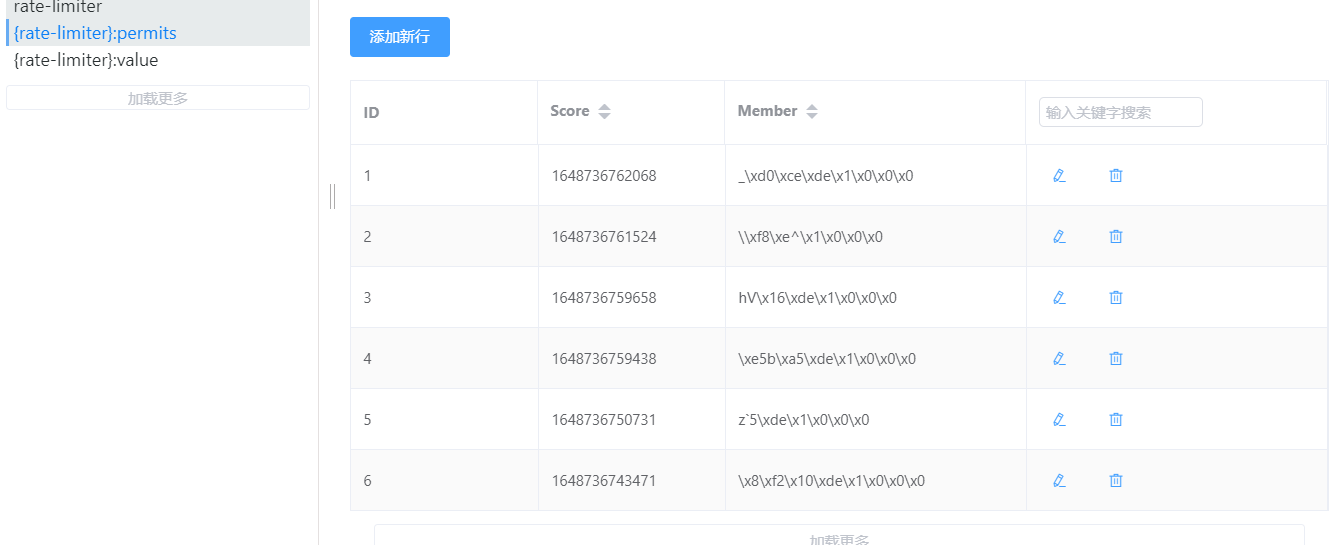
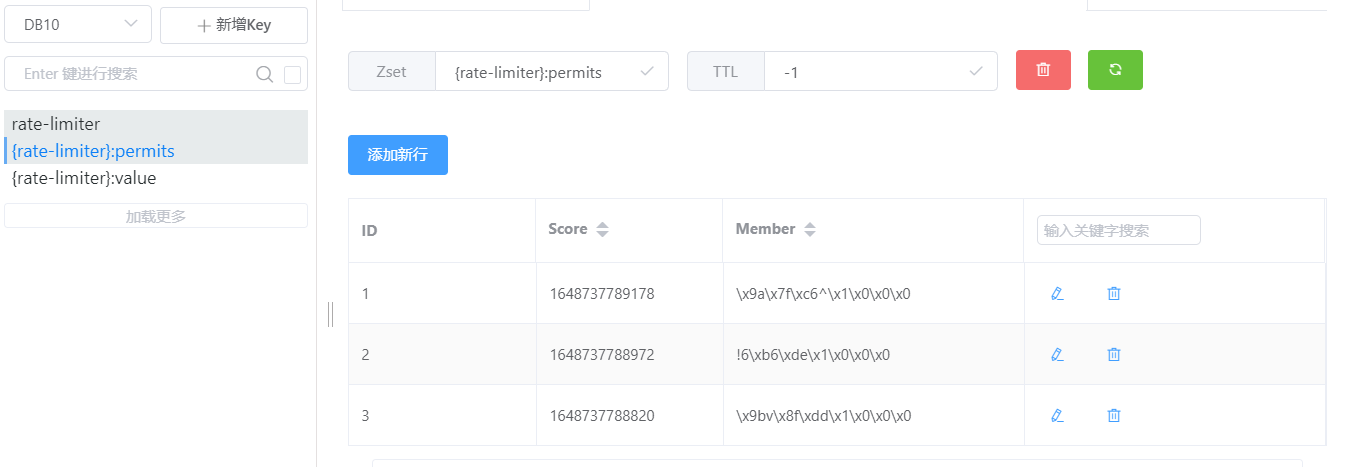
Zset类型缓存{限流名}:permits里存储的是每一次访问时间
String类型缓存{限流名}:value缓存的是还剩余可访问次数
当我们连续访问六次都返回ok,第七次访问时,我的接口返回了fall,此时查看我们的缓存KEY,发现Zset集合存在六个访问
5.规则设置注意事项 规则设置有以下两种模式:
1 2 3 4 5 6 7 8 9 10 11 12 13 14 15 16 17 18 19 20 21 22 void setRate (RateType mode, long rate, long rateInterval, RateIntervalUnit rateIntervalUnit) ;boolean trySetRate (RateType mode, long rate, long rateInterval, RateIntervalUnit rateIntervalUnit) ;
区别
1 2 3 4 5 6 6 , 1 , RateIntervalUnit.MINUTES);7 , 2 , RateIntervalUnit.MINUTES);
setRate 演示 快速访问三次
模拟我们服务器重启
trySetRate演示 设置两分钟后内7个有效令牌
1 2 ra.trySetRate(RateType.OVERALL, 7 , 2 , RateIntervalUnit.MINUTES);
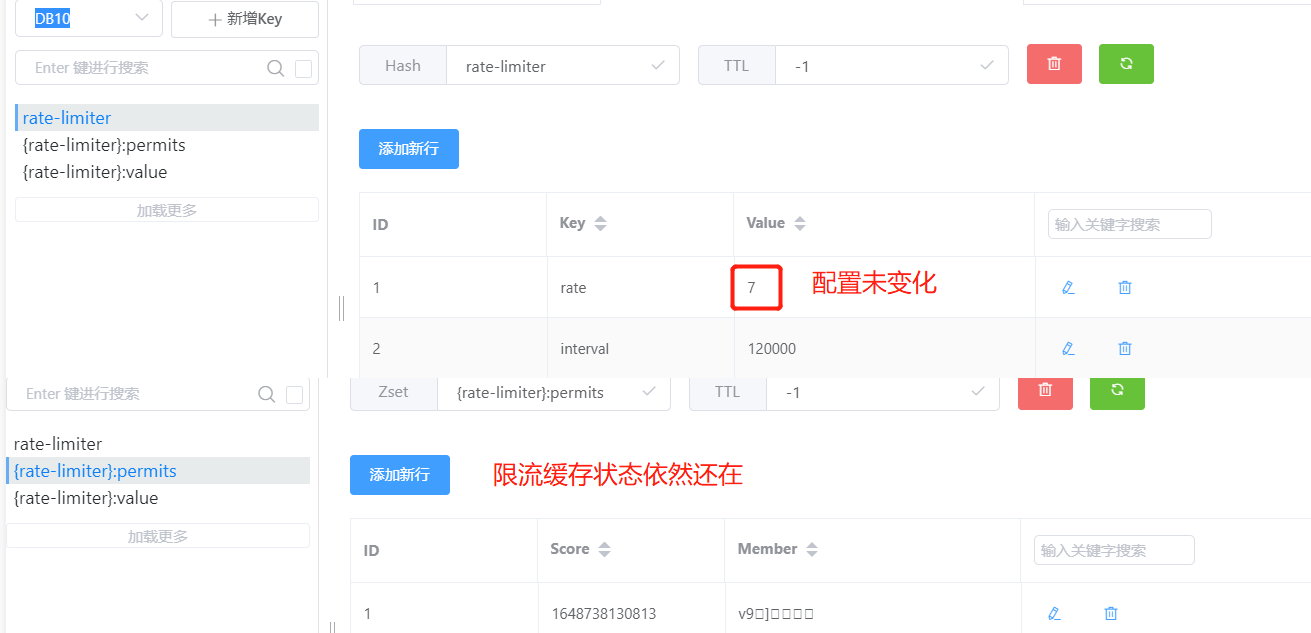
我们快速访问几次,出发限流缓存
修改配置后,重新启动我们的项目
1 2 ra.trySetRate(RateType.OVERALL, 70 , 1 , RateIntervalUnit.MINUTES);
针对这两种特性,我们可以根据自己的需求进行选择!
分布式锁 有点经验的同学一提到使用分布式锁便联想到了redis,那redis如何实现分布式锁呢?
分布式锁本质上要实现的目标就是在Redis中占一个坑(简单的说,就是萝卜占坑的道理),当别的进程也要来占坑时,发现那个坑里已经有一个颗大萝卜时,就只好放弃或者稍后重试。
分布式锁常用手段:
1.使用setNx命令 这个命令的详细描述是(set if not exists),如果指定key不存在则设置(成功占坑),在业务执行完成后,调用del命令删该key(释放坑)
ex:
1 2 3 4 5 6 7 # set 锁名 值
但这个命令存在一个问题,如果执行逻辑中出现问题,可能导致del指令无法执行,那么该锁就会成为死锁了。
可能有小伙伴贴心的想到了,我们可以给这个key再设置一个过期时间呀。
比如
1 2 3 4 5 6 7 8 setnx vehicle-lock 111
即使这样操作后,该逻辑仍有问题,由于setnx 与expire 是两条命令,如果在 setnx与 expire之间,redis服务器挂了,就会导致expire不会执行,从而过期时间设置失败,该锁仍会成为死锁
根源是 setnx与expire两条命令并不是原子命令
且redis的事物也无法解决 setnx 与expire的问题,因为expire是依赖于setnx的执行结果的,如果setnx没有成功,expire则不应该执行。事物又无法进行if else判断,,,顾 setnx +expire方式实现分布式锁,并不是优解
2.使用setNx Ex 命令 上方已经说了 setNx+ expire的问题,Redis官方为了解决这个问题,在2.8版本时引入了 set指令的扩展参数
使得 setnx 与 expire命令可以一起执行
ex:
1 2 3 4 5 # set 锁名 值 ex 过期时间(单位:秒) nx
从逻辑上来讲,setNx Ex 已是优解了,不会使该分布式锁成为死锁
但在我们开发中,或许仍会出现问题,为什么呢?
由于我们一开始为此锁设置了一个过期时间,那假如我们的业务逻辑执行耗时超过了设置的过期时间呢?就会出现一个线程未执行完毕,第二个线程可能持有了这个分布式锁的情况。
所以呢,如果使用 setNx Ex 组合,必须要确保自己的锁的超时时间大于占锁后的业务执行时间
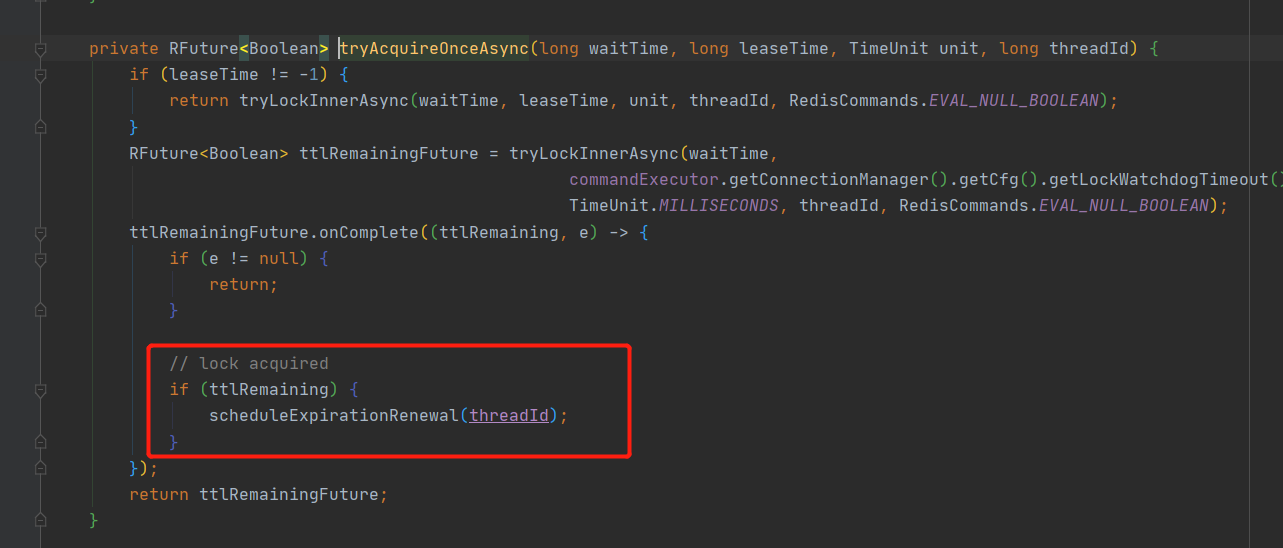
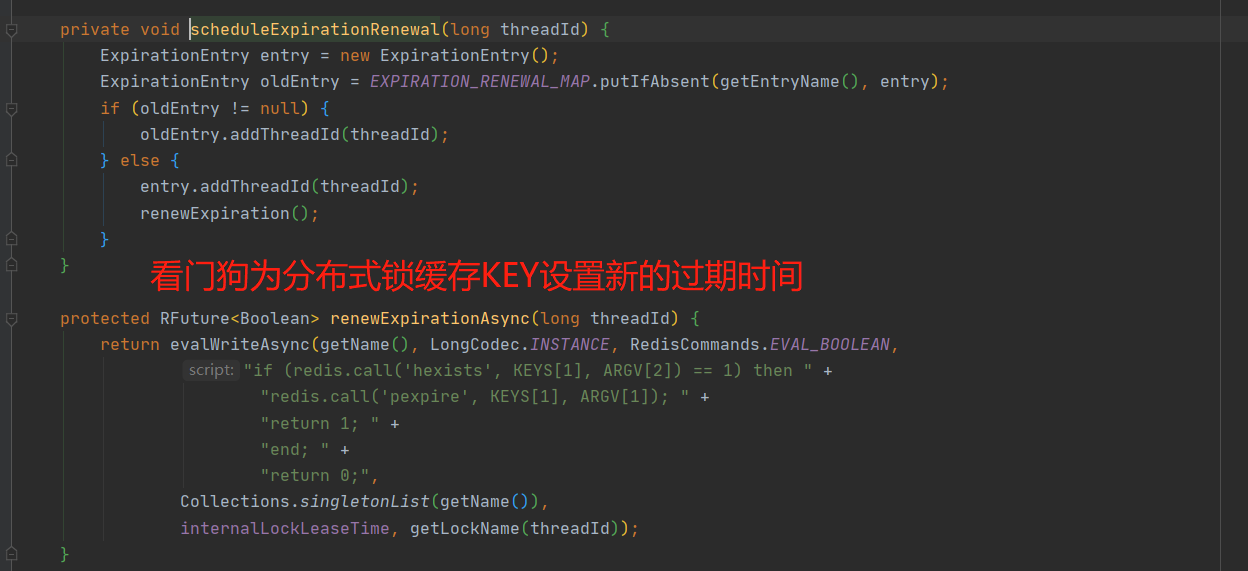
3.使用Redission 上方介绍的 setNx 与 setNx Ex 命令,都是Redis 服务器为我们提供的原生命令,也或多或少的存在着一部分问题,为解决setNx Ex命令存在着业务逻辑大于锁超时时间的问题,Redisson内部提供了一个监控锁的看门狗,它的作用是在Redisson实例被关闭前,不断的延长锁的有效期。默认情况下,看门狗的检查锁的超时时间是30秒钟(就是续期30s),也可以通过修改Config.lockWatchdogTimeout来另行指定,锁的初始过期时间默认也是30s
ex:
1 2 3 4 5 6 7 8 9 10 11 12 13 14 10 , TimeUnit.SECONDS);boolean res = lock.tryLock(100 , 10 , TimeUnit.SECONDS);if (res) {try {finally {
尝试获取锁
尝试续期
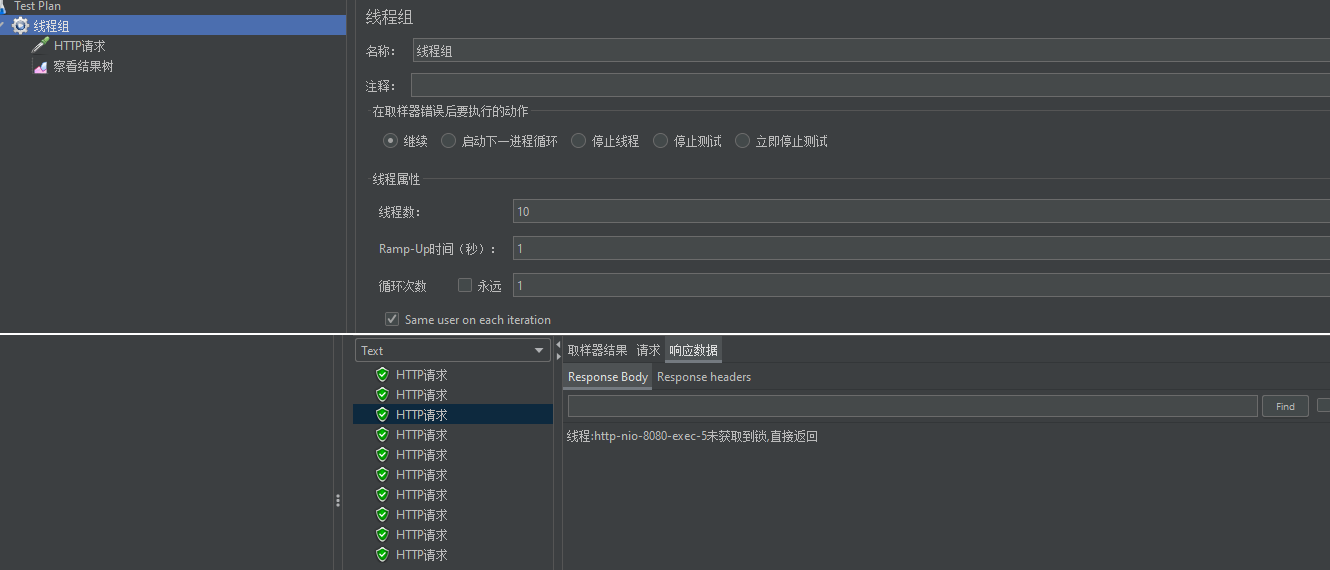
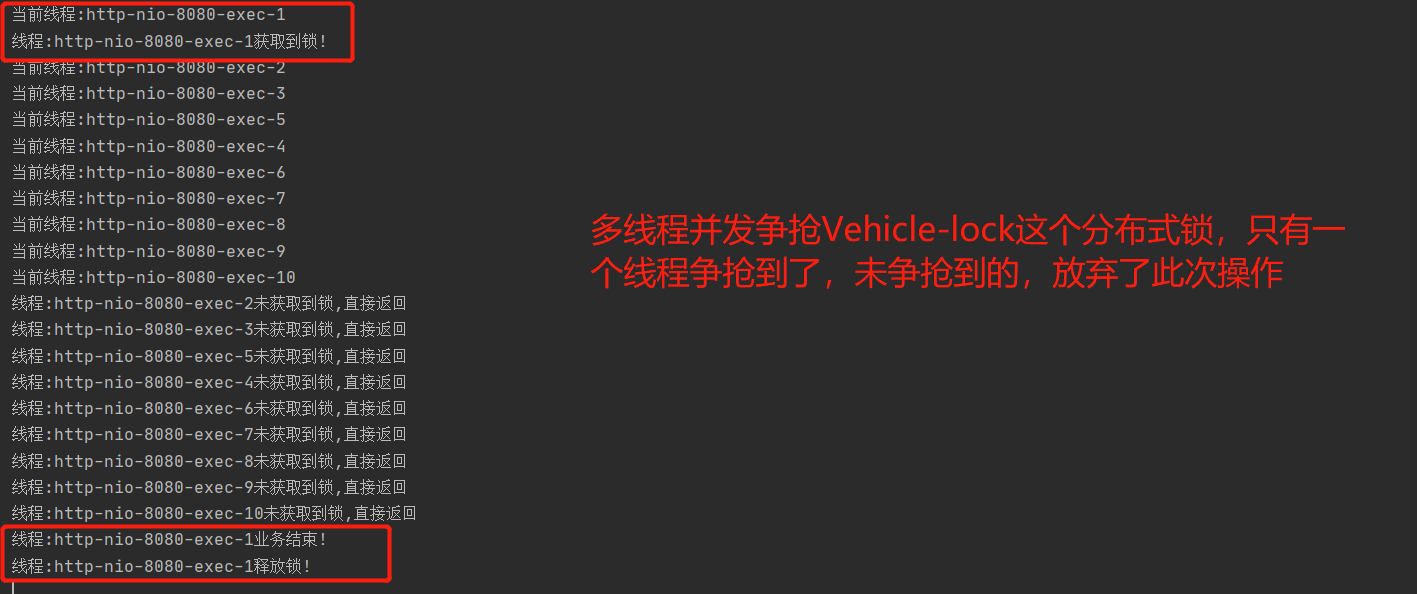
分布式锁使用详情示例 获取到锁的执行,未获取到的放弃操作
1 2 3 4 5 6 7 8 9 10 11 12 13 14 15 16 17 18 19 20 21 22 23 24 25 public String threadLock () {RLock lock = redissonClient.getLock("vehicle-lock" );"当前线程:" + Thread.currentThread().getName());try {if (!lock.tryLock(1 , TimeUnit.SECONDS)) {String message = "线程:" + Thread.currentThread().getName() + "未获取到锁,直接返回" ;return message;"线程:" + Thread.currentThread().getName() + "获取到锁!" );4000_0 );"线程:" + Thread.currentThread().getName() + "业务结束!" );catch (InterruptedException e) {throw new RuntimeException (String.format("出现异常:%s" ,e.getMessage()));finally {if (lock.isLocked() && lock.isHeldByCurrentThread()) {"线程:" + Thread.currentThread().getName() + "释放锁!" );return "线程:" + Thread.currentThread().getName() + "业务结束!" ;
访问接口后,快速查看redis,发现罗卜已成功占坑
由于我们设置了睡眠40s(模拟业务耗时大于分布式锁过期时间),我们可以不断刷新缓存KEYvehicle-lock测试看门狗续期
当锁已占用10s,看门狗便会触发一次锁续期
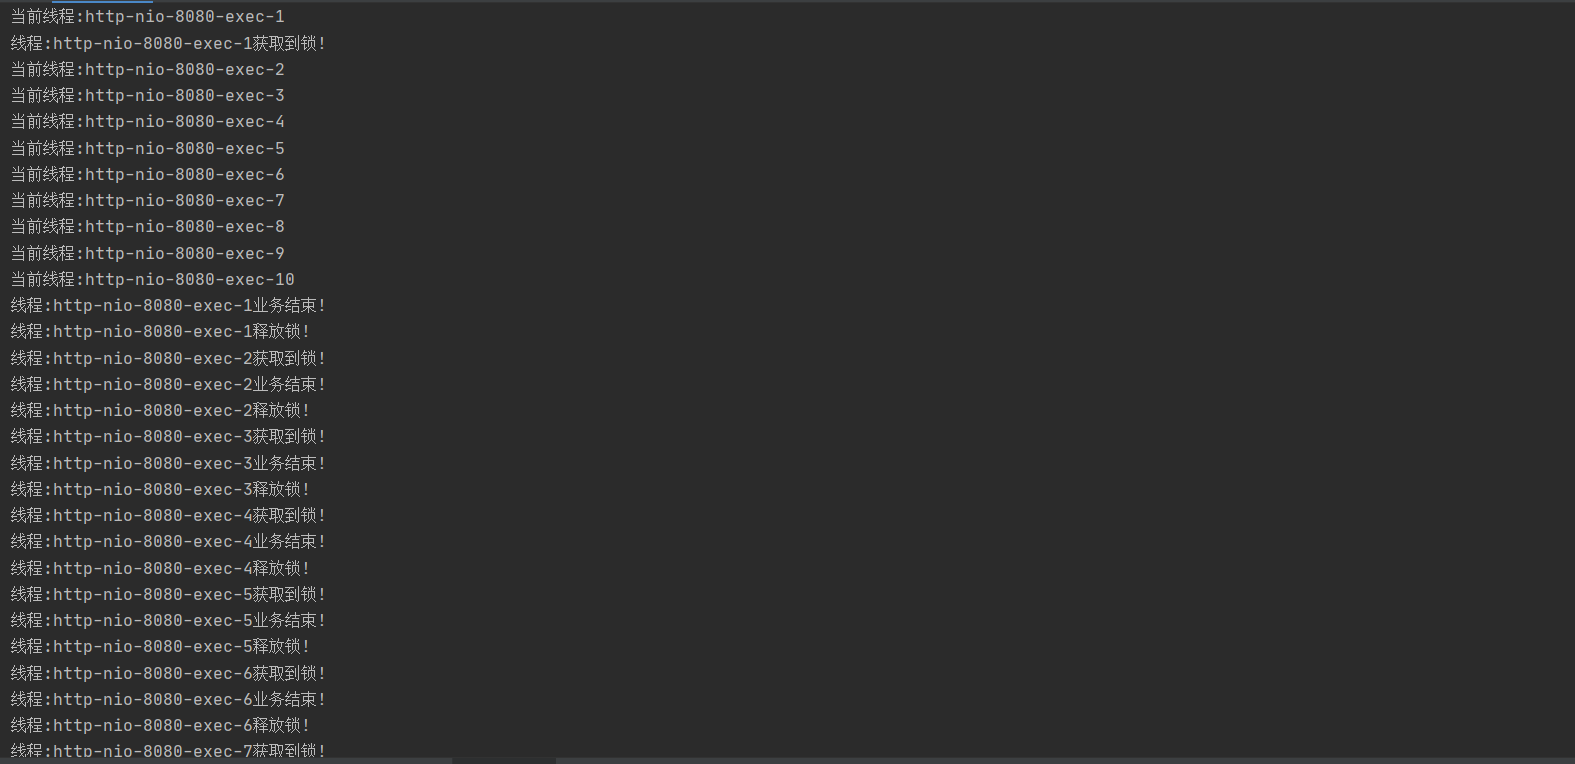
整个流程
1 2 3 4 5 当前线程:http-nio-8080-exec-1
高并发模拟:
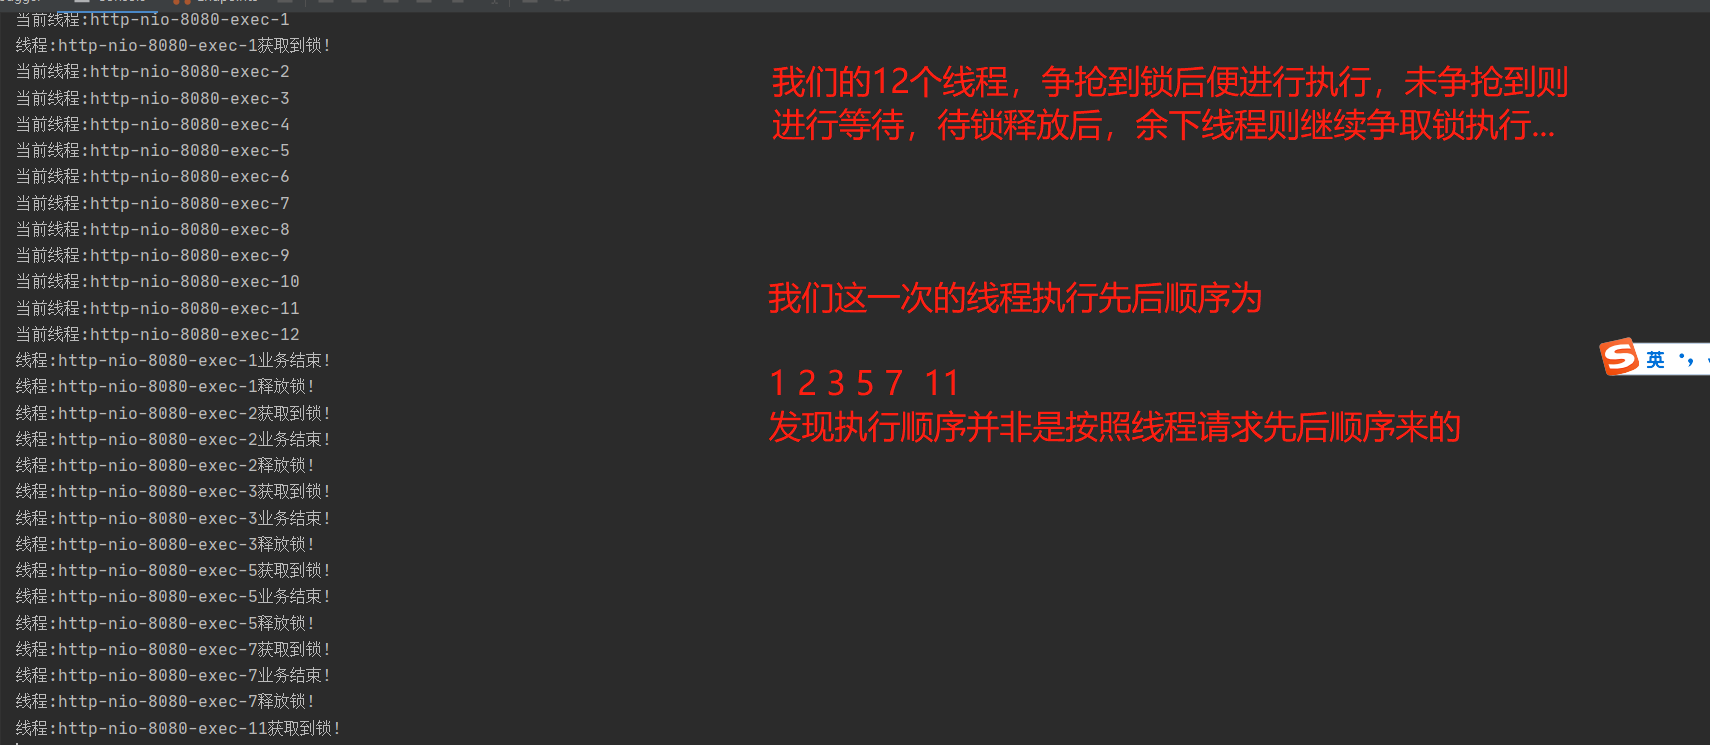
获取到锁的执行,未获取到待锁释放后再争抢获取锁执行
1 2 3 4 5 6 7 8 9 10 11 12 13 14 15 16 17 18 19 20 21 public String threadLock () {RLock lock = redissonClient.getLock("vehicle-lock" );"当前线程:" + Thread.currentThread().getName());try {"线程:" + Thread.currentThread().getName() + "获取到锁!" );10000 );"线程:" + Thread.currentThread().getName() + "业务结束!" );catch (InterruptedException e) {throw new RuntimeException (String.format("出现异常:%s" ,e.getMessage()));finally {if (lock.isLocked() && lock.isHeldByCurrentThread()) {"线程:" + Thread.currentThread().getName() + "释放锁!" );return "线程:" + Thread.currentThread().getName() + "业务结束!" ;
Redission提供了多种类型的分布式锁,比如 可重入锁(Reentrant Lock)、公平锁(Fair Lock)、联锁(MultiLock)、红锁(RedLock)、 读写锁(ReadWriteLock)
公平锁使用详情示例 公平锁它保证了当多个Redisson客户端线程同时请求加锁时,优先分配给先发出请求的线程。所有请求线程会在一个队列中排队等待
1 2 3 4 5 6 7 8 9 10 11 12 getFairLock (String name) ;
1 2 3 4 5 6 7 8 9 10 11 12 13 14 15 16 17 18 19 20 21 public String threadFairLock () {RLock lock = redissonClient.getFairLock("vehicle-fair-lock" );"当前线程:" + Thread.currentThread().getName());try {"线程:" + Thread.currentThread().getName() + "获取到锁!" );1000_0 );"线程:" + Thread.currentThread().getName() + "业务结束!" );catch (InterruptedException e) {throw new RuntimeException (String.format("出现异常:%s" ,e.getMessage()));finally {if (lock.isLocked() && lock.isHeldByCurrentThread()) {"线程:" + Thread.currentThread().getName() + "释放锁!" );return "线程:" + Thread.currentThread().getName() + "业务结束!" ;
1 2 3 4 5 6 7 8 9 10 11 12 13 14 15 16 17 18 19 20 21 22 23 24 25 26 27 28 29 30 31 32 33 34 35 36 37 38 39 40 41 当前线程:http-nio-8080-exec-1
我们可以根据自己的业务场景来灵活选择使用哪一种锁,以及是否让未获取到锁的线程等待执行或者放弃执行任务
Redission还有其他特别强大的功能
